
Miele vacuum maintenance is essential for keeping your vacuum operating at peak efficiency and extending its lifespan. Regular care not only ensures consistent cleaning performance but also prevents common issues like reduced suction, clogging, and premature wear on components. Whether you use your vacuum for carpets, hard floors, or a combination of surfaces, taking a few simple steps can make a significant difference in its longevity.
Routine maintenance includes checking and cleaning filters, emptying dust containers or bags, and inspecting brushes or rollers for debris that can impair performance. Properly maintaining these components helps ensure that airflow remains unobstructed, which is critical for effective cleaning. Regular checks also allow you to spot early signs of wear or damage, which can be addressed before they lead to more serious problems.
In addition to keeping your vacuum mechanically sound, maintenance contributes to a healthier home environment. Dust, allergens, and pet hair trapped inside a vacuum can reduce indoor air quality if the vacuum is not properly cared for. By keeping filters clean and replacing them when needed, you ensure that your vacuum continues to capture and contain particles effectively.
With a few minutes of regular attention, Miele vacuum maintenance can save you time, money, and frustration in the long run. Establishing a simple maintenance routine supports consistent performance, protects your investment, and keeps your home cleaner and healthier. Whether you’re a frequent user or occasional cleaner, prioritizing maintenance ensures your vacuum continues to perform at its best year after year.
In terms of feeling domestic and “adult” (reader keep in mind the author is a Millennial under 30), I feel pretty spoiled with all the cleaning products I have, most of which come from AchooAllergy. My favorite, though, is my Miele Twist vacuum. It’s a huge upgrade from what I had before. Previously, I had used only less expensive, mediocre vacuums that worked only half the time. I likely spent more time unclogging, emptying, and maintaining the vacuum than I did cleaning with it. It probably didn’t help having sloppy roommates who often acted like it was their first time being on their own. In the carpeted apartment/condo we called home, the vacuum certainly got a workout.
 The Twist is the best vacuum I’ve ever had, picking up everything in its path. Regardless of whether it was carpet, linoleum in the kitchen, tile in the bathroom, or heavy Persian rugs, it did the job with ease. Not to mention, it was quiet enough for those apartments (paper-thin walls and all) to use day or night for a quick ten-minute cleaning spree.
To maintain your Miele upright vacuum is really a simple task, particularly with the Miele Twist (no HEPA filter). Today, I want to show you how easy it is to replace the filters and dust bags.
At this point, it had been about 6 months since I changed the dust bags (yeah, gross and LONG overdue). As you can see in the picture, it’s completely packed with dust, dog hair, and debris. Also note the suction flap keeping that debris in the bag.
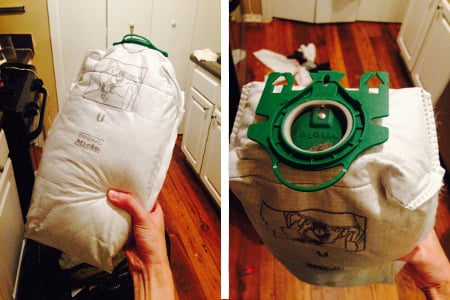 After tossing it, I simply slipped another bag into the green clip and changed the Airclean filter and the pre-motor filter. I hope that one day Miele will make biodegradable bags, but it’s likely to be tricky given how well these bags filter out visible dust and dirt as well as some of the tiny particles you can’t see.
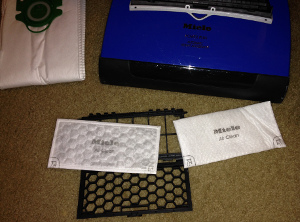
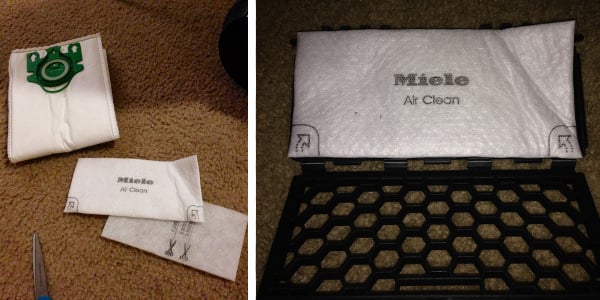
In each box of Miele U bags are a premotor filter and an AirClean filter. For the Twist, this box generally represents all the bags and filters you’ll need for an entire year. Miele recently changed their dust bags to a new slimmer “3D design”. They’re redesigned to have more surface area and better utilize the entire capacity of the bag to hold more dust and debris than the previous ones.
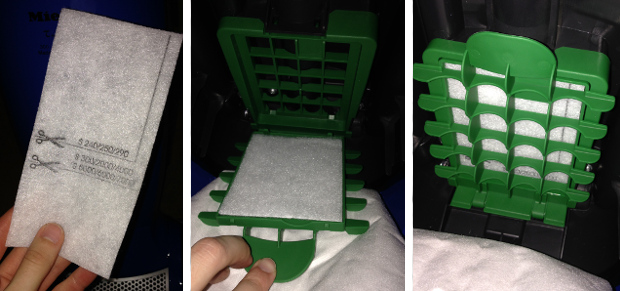
First I changed the Airclean filter, located in the front of the machine on the power head. It’s pretty easy to change, and like the dust bag, it was time! Even though the filter is a tad bit bigger than the filter cage, that’s alright, it easily closed and went back into the slot with ease. Due to how similarly sized the filter and filter basket/cage are, I don’t recommend cutting that filter down.
The pre-motor filter was a quick change. It’s located behind the dust bag, and you’ll know you’re in the right spot because of the green cage/bracket holding it in place. You will have to cut the pre-motor filter down to size, but it was easy to make a straight cut with the dotted lines along the filter. Both sides feel the same, so it didn’t matter which way I placed it in the filter cage.
Since changing the filters and bag took about 5 minutes I decided to check out the brushroll and plate to make sure they were also clean. So I carefully flipped the vacuum over to check out the brush roll. I took my scissors and cut all of the string and hair along the bar. I would say, do this on a smooth surface that you can sweep up afterwards. There’s no point in cutting away wound-up hair and carpet fiber and getting the bright idea of sucking it up with the vacuum. Unless you use the wand to suck it up, you’ll likely just end up with a lot of it wrapped back around the brushroll.
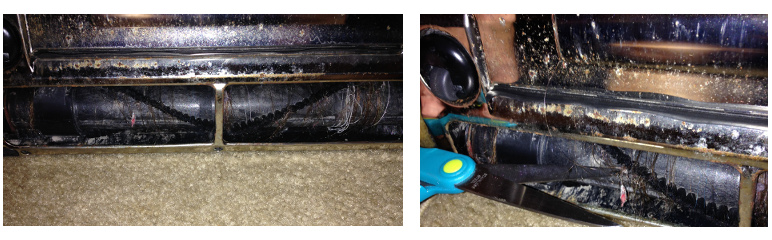
The metal plate was also getting a little gunky, so I took some vinegar to wipe it down and clean up anything that I could beneath it, if I could avoid Lysol, Clorox, and anything harsh or corrosive on the plate.
After that, my vacuum was as good as new, and with the Twist, that’s all there is to do to maintain your Miele upright vacuum. I could tell a huge contrast in how well my vacuum was picking up debris again (again, PLEASE don’t let your bag get as full as mine), my rug and carpets were looking fresh and soft.